- ASC Proceedings of the 42nd Annual Conference
- Colorado State University Fort Collins, Colorado
- April 20 - 22, 2006
|
|
|
Developing a Laboratory for a Soils and Foundations Course in a
Construction Management Program
|
David W. Carns, P.E. Central Washington University Ellensburg, Washington |
|
Soils and foundations are involved in nearly every construction project and hence it is essential that construction management students gain a practical understanding of soil testing and behavior. Without this knowledge it would be very difficult for construction management graduates to responsibly manage many construction projects. Many textbooks and courses covering soils and foundations tend to be very design-oriented and technical in nature. While they typically include coverage of soil types, testing and soil behavior, construction management students are not design engineers they tend to learn best through a “hands-on” laboratory experience. This paper discusses the need for a soil laboratory experience and explains how a simple soils laboratory was created and successfully integrated into an existing Soils and Foundations course for construction management students.
Key Words: Soils, Foundations, Laboratory, Construction Management |
Introduction
Many construction management and civil engineering programs often teach soil mechanics and foundations without the benefit of a practical “hands-on” laboratory experience. Reinforcing theory learned in the classroom with additional delivery modes, including laboratory experiences, has long been recognized as being particularly important to construction management education (Bolivar, 1998). The addition of such a laboratory component, when appropriate, often solidifies the students’ understanding of the concepts learned in the classroom and also aids with student retention of the subject material.
Construction management students, as a whole, tend to be very practical individuals who benefit from experiencing first-hand some of the basic behavior of soils in a laboratory environment. By collecting soil samples, classifying soils and subjecting these soils to a series of ASTM tests, these students are able to truly understand, even if in a small way, the engineering and construction properties of these soils and how they behave under different conditions in the field. This type practical understanding is especially critical to students in a technical management field, such as construction management, as opposed to design engineering (Wentz and Alter, 1998).
This paper will explain how the need for a laboratory component to an existing Soils and Foundations class at Central Washington University was identified, how the laboratory exercises were created, how funding was obtained and how the lab space was designed. In addition, the paper will also explain how the laboratory experience relates to the course as a whole, how the students benefit from the lab component and how the students’ feedback has been instrumental to making changes to the lab.
Background of the Course
The Construction Management program at Central Washington University began nearly 30 years ago and, like many programs, was initiated primarily as a residential construction program with only a small portion of the students seeking employment in commercial construction. As the program grew and evolved to attract more students, and more contractor employers began hiring these students, the emphasis in the curriculum changed to include a focus on commercial building construction. Student exposure to soil mechanics, foundations and geotechnical engineering during this time period was very limited. These subjects were covered in a construction materials and methods class in just one or two weeks. More recently there has been a marked interest from students in heavy/civil construction and a corresponding interest from contractors specializing in this type of work to hire these students upon graduation. Based on a variety of assessment methods, including input from an industry advisory council, alumni surveys and surveys of graduating seniors it became apparent that there was a need to include more in-depth coverage of soils and foundations. In 1996 a four credit (quarter credit) senior level engineering-based course covering soils and foundations was taught for the first time. The course had an enrollment of 17 students at that time and was primarily an engineering-based course emphasizing soil classification, soil mechanics and design of both shallow and deep foundations and retaining structures. In addition to coverage of the different types of foundations the course also included fairly extensive coverage of actual concrete foundation and retaining structure design, including reinforcing steel placement. Prerequisites included a junior level construction methods and materials course, Construction Estimating and Strength of Materials (engineering mechanics). At this point the course was delivered in lecture format without a laboratory component and course assessment was performed utilizing weekly homework assignments and three exams.
Identifying the Need for the Laboratory and Student Learning Styles
At the end of each quarter all students in this course are given the opportunity to evaluate the instructor and the course and to offer feedback and suggestions for improvement. It became clear that the students were interested in the addition of a laboratory component to enhance their understanding of soil properties and less coverage of foundation design. Although a basic understanding of design fundamentals is important, it is clear that construction management educators are not teaching design engineering, rather technical management (Wentz and Alter, 1998). The established industry advisory council had the same suggestion, although there were some reservations. From a practical standpoint the laboratory was envisioned as being established in the existing building with limited space and equipment. With this in mind the students would be working with limited soil samples in a small area. There was concern that this type of lab would be useful for demonstrating the testing procedures used in industry to check material quality but would not give students a good feel for workability of soils in a field environment. The laboratory experience would also not be considered a “holistic approach to soils construction and also would not be able to give to the students an indication of how soil behaves when subjected to various types and weights of compaction equipment (Johnston, 1990). In addition, there is a general concern among construction educators that incorporating hands-on learning environments may go against the idea of construction management graduates being viewed in the industry as professionals. There was also discussion to address the concern that creating an additional laboratory experience may create an image in the industry that the program is training trades people, as opposed to management professionals.
However research also indicates that incorporating practical activities, such as laboratory exercises, can be more important than theory for construction management students (Bolivar, 1998). According to learning style models, many students are categorized as “active learners” who learn best by doing something, working in a group and explaining it to each other and by trying it out. This style of learning parallels a typical laboratory environment. A research study was undertaken at Michigan State’s Construction Management Program to give an indication of which learning style was preferred by construction management students. The Index of Learning Styles (ILS) model was used as the basis for an extensive survey that involved 277 construction management students in construction courses only, ranging from freshman to graduate students. The ILS model is based on the Felder-Silverman Learning Style Model and questions were used in the survey to determine the students’ perception of which of the four styles both “motivates me to learn” and “helps me to learn”. One of the styles is identified as “Active/Reflective”, with the idea that active learners prefer an environment that allows them to interact with each other while reflective learners prefer to work alone and think about presented information. The results of the survey indicate that all classes of students, freshmen through graduate students, preferred an active learning environment over a reflective learning environment. As a whole the study indicates that, on average, construction management students in the program at Michigan State preferred the active, sensing, visual and sequential learning styles. (Abdelhamid, 2003). The results of this particular survey are reinforced with results from student evaluation of instruction from a variety of courses in the Construction Management program at Central Washington University. These results indicate a strong preference by the students to include a structured laboratory component in appropriate courses. It was finally decided that the benefit of having the students actually work with soil samples and the related test equipment, and to perform ASTM laboratory tests, would outweigh any of the previously mentioned concerns.
Identifying Lab Exercises
In order to create a laboratory experience that would prove beneficial to the students in the Soils and Foundations class and yet be both practical to initiate and maintain, the program turned to contacts in industry for advice. A local geotechnical engineering firm was call upon to provide suggestions for tests that could be fairly easily performed by undergraduate students in a two-hour time frame (the time that was initially set aside for the new laboratory component of the course) and would not require a large amount of floor space or expensive or complicated equipment. Also, a web search was conducted to give an indication of what other programs have included in their laboratories. Initial discussion led to the idea of incorporating the following tests into the laboratory component of the course:
Soil Sampling and Moisture Content
In-Place Density Testing, Sand Cone Method
Grain Size Analysis (Sieve Analysis)
Atterberg Limits; Liquid Limit and Plastic Limit
Soil Classification Per The Unified Classification System
Compaction Moisture/Density Relationship; Standard Proctor and Modified Proctor Testing
At first, consideration was given to including more complex tests, such as soil permeability, soil strength (unconfined compressive test and triaxial compressive test) and soil consolidation. However it was decided not to include these tests initially because the equipment is considerably more expensive than equipment for the basic tests and it would not be practical to include the tests within the proposed two-hour time frame.
Physical Space and Planning the Laboratory
In order to create a functional soil mechanics laboratory that could be used to supplement the existing Soils and Foundations course, a room adjacent to the classroom where the course was currently being taught was identified. The room itself, on the second floor of the technology building, was being used for storage but had the essentials to make a suitable, but simple laboratory space. The room has a hard-trowel concrete floor, measures approximately 50 feet by 40 feet (2000 square feet) with a twelve-foot high ceiling. Electrical service to the room was adequate (110 volt single phase), plumbing was limited to a single antiquated wash basin and bench and cabinet storage was very minimal. Egger, Varavand and Shofoluwe (1990) conducted a mail out survey of the physical facilities in accredited construction education program and 19 schools responded. The schools with a construction materials testing laboratory space that included soils testing had a range of laboratory space from 500 square feet to over 3000 square feet. Based on this information and a vision for the layout of the soils testing equipment it was determined that the available room would likely prove adequate to house the new laboratory. A layout for the proposed laboratory space was created that included approximately 25 linear feet of workbench space along one wall, 240 square feet of working table space, 16 lineal feet of eight foot high storage cabinets and a heavy-duty laboratory sink.
Equipment and Funding Sources
A budget was created for building the soils lab that included the purchase and/or donation of the following equipment:
Two electric sieve shakers for eight-inch diameter sieves
Two complete sets of eight-inch diameter sieves
Four quadruple-beam gram balances
Two 36 lb capacity field scale balances
Two 110 volt electric drying ovens
Four complete sand cones and corresponding equipment
Four liquid limit test sets
Four plastic limit test sets
Six Proctor molds
Three Standard Proctor hammers and three Modified Proctor hammers
Numerous pieces of miscellaneous equipment including mortar and pestle sets, soil sample cans, water bottles, spatulas, brushes, an industrial-duty shop vacuum, etc.
It was estimated that to purchase all new basic equipment listed above and fixtures to outfit the space would cost approximately $20,000. With university funding for equipment very limited, the Construction Management Program at Central Washington University has an account established within the general university foundation. Private donations made to the program, primarily from construction companies who have hired program graduates, are deposited into this account to be used as discretionary funds in a manner that will directly benefit the program. At the time the laboratory was to be established, however, it was determined that it would be best to go directly to the construction industry to seek funding and equipment donations specifically for the purpose of creating this laboratory. A proposal was made to a large construction industry association in the amount of $8860, and the grant request was fully funded. In addition two private geotechnical firms purchased and donated two complete sets of soil sieves. The two drying ovens (used) were located on campus and incorporated into the lab. Wooden storage cabinets were also located through campus surplus. Four large (six foot by ten foot) sturdy work tables were also found in surplus and a local fabricator made and donated four stainless steel bench tops for the tables. The existing wash basin was removed and a six-foot commercial grade double stainless steel sink and drain board, recently designated as surplus from campus dining services, was installed in the laboratory. A work study student was hired to refinish existing wooden-topped work benches, install a marker board and finish some other minor projects in the room.
Incorporating the Laboratory Exercises into the Course
Since the intent of creating the laboratory was to augment the lecture portion of the course and to give the students a “hands-on” practical and visual experience the exercises were created and included to somewhat correspond chronologically with the material covered in the lecture. As mentioned earlier, when the course was originally created and offered in fall quarter, 17 students, construction management seniors, were enrolled and the format was lecture and problem solving. At the time the laboratory space was created there were 24 students in the course. In order to establish time for the laboratory the four-credit (quarter system) course was changed from a four day per week lecture format to a three day per week lecture with the addition of two two-hour laboratory sections. In this manner the class was divided such that one half of the 24 students would attend one laboratory section and the other one half would attend the other laboratory section. Since that time enrollment in the course has grown to 34 students, with 17 in each laboratory section. Each laboratory exercise was created so that students could work in groups of four.
The class is offered every fall quarter, which is basically 11 weeks in length. The laboratory section does not meet the first week and the six laboratory exercises are spread out over the next ten weeks. The first exercises are very simple, with the students collecting soil samples and using the balances and ovens to determine the moisture content. The exercises become more involved as the course progresses but the intent is to expose the students not only to proper testing procedures but also to have them leave the course with an idea of some very basic soil properties and soil behavior. Exercises that involve work outdoors are performed near the beginning of fall quarter, when the weather is cooperative. Also, near the beginning of the quarter each student group is required to bring to the laboratory at least one soil sample for drying and testing. The more lengthy exercises are assigned near the end of the quarter after the students are more familiar with the laboratory equipment and procedures, in addition to corresponding to the lecture material. The laboratory sections are required as part of the course and even though students do not receive a separate grade for the laboratory work they are responsible for the covered material and are tested on this material as part of the regular course exams. In the interest of organization and to make the laboratory experience more meaningful a manual was created for this portion of the course.
Laboratory Manual for the Students
In order to keep the laboratory experience organized and meaningful for the students a 25 page manual was created specifically for this portion of the course. Each student is required to purchase the manual, which is available at a local copy facility, for a nominal charge, and bring it to each laboratory session. The manual includes an introduction to the laboratory; providing an explanation of procedures, equipment, cleanup, student responsibilities, etc. It also includes a section specific to each of the six exercises. Each or these six sections includes an introduction, a section on equipment, specific step-by-step procedures, a section on calculations, general comments, a list of “learner outcomes” and photographs of the equipment to be used for the particular exercise. The learner outcomes are presented in bullet format and include what each student is expected to accomplish by completing the particular exercise. In addition there is a calculation sheet, in table format, that is to be completed in the laboratory by each student and submitted the following week for credit. In addition, some of the laboratory exercises require the students to place data collected in the lab in a spreadsheet and to plot this data in graphic format. This information, along with the calculation sheet contained in the lab manual for each lab exercise, is then submitted to the instructor with corresponding calculations, graded and then returned to the students. This work becomes a portion of each student’s grade. As an example of the format of each lab exercise, included below is a copy of a portion of the laboratory manual entitled “Standard and Modified Proctor Compaction Test”.
LAB EXERCISE: Standard and Modified Proctor Compaction Test
Introduction: Compaction means to increase the density of a particular soil by reducing the air voids in the soil. Soil is often compacted for a variety of reasons; to improve bearing strength beneath footings and pavements, to reduce settlement and to reduce permeability. Different specifications require different levels of compaction, but most of these specifications require that the soil density achieved through field compaction reach a specified percentage of the soil density achieved through a standard laboratory compaction test. The most common lab tests are the Standard and Modified Proctor tests. These tests are similar to each other in most respects and their primary purpose is to develop a curve to indicate the soil’s dry density as a function of moisture content, using a standard amount of compaction energy.
Equipment:
1. A 1/30 cubic foot compaction mold with an extension
2. A No. 4 sieve
3. A Standard (5.5 lb) hammer for the Standard Proctor test or a Modified (10 lb) hammer for the Modified Proctor test
4. Field scale with an accuracy of 0.01 lb
5. Quadruple-beam balance with an accuracy of 0.01 grams
6. A flat pan
7. A straight edge
8. A sample extractor
9. A water squeeze bottle
10. Five moisture cans
11. A drying oven
Procedure:
1. Obtain approximately 10 lbs. of air-dry soil on which to conduct the Standard or Modified Proctor test. Break all lumps in the soil and place it in a pan.
2. Sift the soil through the No. 4 sieve and collect the portion that passes the sieve. Make sure that this is at least six lbs.
3. Add water to the soil to bring it up to a moisture content of about 10%. Mix it thoroughly. In order to estimate the amount of water that must be added, assume that the soil is currently at a MC of 5%.
4. Weigh the Proctor mold with the base attached to the nearest 0.01 lbs. Do not include the extension when weighing the mold.
5. Attach the extension to the top of the mold.
6. Add the moist soil to the mold and compact this soil in lifts with either the Proctor or Modified Proctor hammer, as follows:
a) Standard Proctor: Three lifts, 25 blows per lift.
b) Modified Proctor: Five lifts, 25 blows per lift.
Add the lifts such that when the last lift is compacted the soil is slightly above the rim of the mold (not the extension).
7. Very carefully remove the mold extension, taking care not to disturb the compacted sample.
8. Using the straightedge, trim off the excess soil that protrudes above the mold.
9. Weigh the mold plus base plus moist compacted soil sample.
10. Using the sample extractor, remove the soil from the mold.
11. Using the quadruple-beam balance, weigh an empty moisture can (to an accuracy of 0.01g) and then collect a sample from the extruded soil and place it in the moisture can. Weigh the can plus moist sample again.
12. Place the moisture can in a drying oven and determine the moisture content, as in previous labs.
13. Break the compacted soil by hand and mix it with the left over moist soil in the pan. Add more water to this soil to increase the moisture content by about 3%. Mix thoroughly.
14. Repeat steps 5 through 12.
15. Repeat this procedure until the test has been performed for a total of 5 different moisture contents.
16. Carefully clean, dry and return all equipment to its original location.
17. Clean the lab.
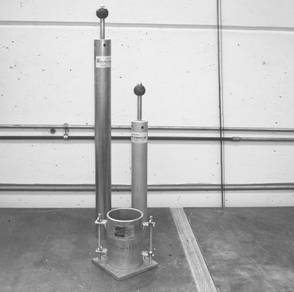
Figure 1: Proctor Mold, Modified and Standard Proctor Hammers
Calculations and Assignment:
The purpose of this laboratory is to create a Proctor (either Standard or Modified) curve for this particular soil. This curve will indicate the relationship between the compacted dry density of the soil and the moisture content, as well as the optimum moisture content for maximum density.
1. Each student is to complete the accompanying calculation sheet and turn this in as part of this lab. Note that this sheet results in five dry unit weights of the soil for five different moisture contents.
2. Each student is to construct, using computer software, a full-sheet graph of the Standard or Modified Proctor test. Use a point and line format (not a bar chart) and show each of the five points as determined in the lab. Each axis must be clearly labeled and the graph must be properly titled. Include your name and date in the title.
3. Indicate the optimum moisture content, in percent, as interpolated from your graph. This can be marked by hand on your graph if you wish.
Learner Outcomes: Standard or Modified Proctor Test
At the conclusion of this laboratory exercise the student shall be able to:
|
Explain the significance of soil compaction and how it is achieved in the field. | |
|
Explain the purpose of both the Modified Proctor and Standard Proctor. compaction tests and the relationship between field compaction and laboratory compaction. | |
|
Properly weigh and compact, following either the Standard or Modified Proctor procedure, a soil at five different moisture contents and determine the dry unit weight of each of the five compacted samples. | |
|
Construct a computer generated graph of dry soil density as a function of moisture content and from this graph determine the optimum moisture content for compaction. |
Student Feedback, Benefits and Changes
Students seem to enjoy the laboratory exercises immensely. They look forward to working with the equipment, working in groups, sampling and testing the soils and the experience of getting their hands dirty while learning about various soil properties. Many students comment on the fact that they gain an understanding of how properties of cohesionless soils, such as gravels and sands, differ from the properties of fine-grained cohesive silts and clays and how these soils behave at a variety of moisture contents. They find especially valuable the Proctor compaction laboratory, as they can see first-hand how varying the moisture content of a soil affects the final soil density when subjected to a standard quantity of compaction energy. They have also commented on how they gain an understanding of what each test actually entails, as opposed to simply reading about the procedures in literature.
Each fall quarter, after completing the class, the students have a chance to evaluate the laboratory experience separately from the regular classroom section. The instrument used for this evaluation is a standard “Student Evaluation of Instruction” (SEOI) form that is used campus-wide. A separate instrument is available for courses featuring a laboratory format. Results from these evaluations indicate a very high satisfaction level with the manner in which the labs are organized (4.93 out of a possible score of 5.0) and the fact that the lab material corresponded well with the material covered in lecture (4.88 out of a possible score of 5.0). Negative comments by the students typically included the suggestion to purchase digital scales and to reduce the amount of clutter in the laboratory space. Over the years, as the number of students in the course has grown, additional scales and other laboratory equipment has been purchased to meet the needs of the students. Recent consideration was given to purchasing testing equipment capable of determining basic strength properties of soils, such as unconfined compressive strength, however because of the cost, limited use and limited building space it was decided not to pursue this option at this time.
Conclusion
The addition of a laboratory component to an existing senior-level Soils and Foundations class in the Construction Management Program at Central Washington University has proven successful. With the help of private donations from the construction industry a simple, economical lab space was furnished and six different lab exercises were created and incorporated into the course. The required lab manual is helpful in organizing the class and student feedback has been very positive. Indications are that the students gain an understanding of basic ASTM test procedures, an appreciation of soil behavior and the feeling that the laboratory experience complements the lecture component of the course.
References
Abdelhamid, T. C. “Evaluation of Teacher-Student Learning Style Disparity in Construction Management Education,” International Journal of Construction Education and Research, Fall 2003, 124-145.
Egger, S.H, Varzavand, S. and Shofoluwe, M., “Survey of the Physical Facilities for an Accredited ACCE Construction Education Program,” Proceeding of the 28th Annual Conference of the Associated Schools of Construction, April 1992, 59-64.
Johnson, H., “The Industry and the Universities; Partners for Better Construction Education,” Proceedings of the 26th Annual Conference of the Associated Schools of Construction, April 1990, 59-66.
Senior, B. A., “Infusing Practical Components into Construction Education,” Journal of Construction Education, Summer 1998, 92-101.