![]()
![]()
- ASC Proceedings of the 39th Annual Conference
- Clemson University - Clemson, South Carolina
- April 8-12, 2003 pp 247-256
|
|
|
Implementing Advanced Construction Layout Technologies Utilizing University/Industry Collaboration – A Case Study
|
|
Building layout is a small, but critical phase of the construction process. For various reasons, many constructors have not taken full advantage of the recent advances in surveying technology that would enable them to increase the efficiency and the accuracy of the layout process. As a result of a partnership with a university based construction department, a contractor was able to use newer technology in conjunction with a total station in the layout and construction of a large county courthouse. Although the technological advance was incremental, the overall results were positive and several interesting ideas emerged. This collaboration demonstrated that relationships between private industry and academia can be mutually beneficial. Although the main purpose of the paper is to document the use of the new technology, some of the advantages of small scale collaborations are also discussed. Key
Words: Collaboration,
Building Layout, Surveying, Technology |
Introduction
One of the hardest
decisions construction companies have to make is when to implement a new
technology. If the technology is
immature, or if personnel are not convinced of its value, the entire effort
often fails. Conversely, if a
company waits too long to adopt a technology, it can fall behind its
competitors. One method of
minimizing the risk of adopting a new technology is to do a pilot project on a
small scale. Partnering with an
academic institution is a way to minimize the labor involved in the initial
learning process. On this project, the building layout process was made
significantly more efficient and less costly by using the advanced features of
the total station.
Construction
educators have realized for several years the benefits of establishing strong
collaborative relationships with industry.
These advantages have been well documented (Tener, 1997, Badger, 1999,
Powers, Powers, Betz & Aslanian, 1988).
Appropriately, accrediting bodies for construction programs such as the
American Council for Construction Education (ACCE) promote these relationships
by requiring interaction between industry partners and educators (Hynds &
Smith, 2001). Many professional educators feel that these partnerships are
critical if construction education is to remain relevant to students, industry
and to the nation at large.
Although there are
myriad examples of collaborative efforts that involve partnerships between the
construction industry and academia, few examples of small scale collaborations
are found in the literature. Small
projects offer some distinct advantages, especially in terms of speed of
response. This paper will document a collaboration involving the use of newer
surveying technology to enhance the construction layout process.
The specific steps involved in the new process of fully utilizing the
total station will be explained in detail.
Initiation of the Relationship
with the Constructor
One of the goals of
the authors’ academic unit is to produce research or outreach that is relevant
and meaningful to the construction industry.
To that end, a three member advisory committee of practitioners was
formed to promulgate advice and ideas.
One of the first
ideas proposed by the group was a study to determine if and how technology can
be utilized to increase the productivity of construction layout. Specifically,
can layout efficiency be increased when a constructor develops digital drawings
exclusively dedicated to construction layout and utilizes this information in
conjunction with advanced features of the total station?
The committee member proposing the study was aware of an upcoming project
staffed with a superintendent who was interested in improving the efficiency of
construction layout. After some discussion, the superintendent and the
construction company agreed to be a participant in the case study.
General Description of Project and
Personnel
The project began in
May 2002. The project includes a 12,945 square-foot renovation of an existing
courthouse (Figure 1) and construction of a new 19,442 square-foot adjacent
expansion. The estimated cost of the project is $3.3 million with renovations,
and the expected construction duration is 10 months.
|
|
|
Figure
1: Existing
courthouse building. |
Description of Construction Layout
Requirements and Procedures
At an initial
meeting, the superintendent described the way he wanted the layout work done.
Points such as corners of strip footings, mid and intersection points of
footing edges, and corners of columns must always be identified.
The superintendent used a felt tip pen to indicate these locations on the
foundation drawings (Figure 2). To
minimize confusion, each point was given a unique label (not shown).
Later, a coordinate system was established and related coordinate values
for each point were calculated.
In addition to the
points shown on Figure 3, the superintendent explained that he needed certain
reference and control points, to check and control the layout work. These points
were also identified on the foundation drawings.
The project manager
explained that most of the information required to do the building layout had
already been created in digital format, either by the architect or the engineer.
He described the frustration he frequently encountered when trying to
obtain this information. He explained that architects and engineers are
generally reluctant to share the digital information with constructors.
The project manager
further explained that he felt the ideal situation for the constructor is one
where the contractor owns all the digital information.
Since this was not the case for the Courthouse, the project manager felt
that the contractor should at least own the digital layout drawings.
Although there would be some obvious duplication of effort, he felt there
would be considerable benefit in a system where the contractor created digital
layout drawings that would contain only layout information and not extraneous
details.
|
|
|
Figure
2: Typical
layout points identified by the superintendent (red dots). |
As part of the
academic contribution to the project, the authors agreed to develop the digital
layout drawings for the constructor. A set of the architectural and structural
engineering drawings were obtained, and the information needed by the
superintendent was recorded. The
authors were now ready to develop the digital layout drawings.
Developing Digital Construction
Layout Drawings
The next logical step
in the process required the authors to develop a complete understanding of the
equipment the superintendent planned to use to layout the building.
The superintendent had given considerable thought to the problem, and
proposed using the contractor’s total station in conjunction with their data
collector. After referring to
various manuals, AutoCAD 2000 was chosen for the software to develop the layout
drawings (Holloway & Lukesh, 1994). Another
software, Survey-Link, which is able to transform the layout data information
into a format which can be read directly by the data collector, served as a
bridge from AutoCAD drawings to the data collector. One of the more time
consuming aspects was to determine the exact format required to export the data
from AutoCAD to the Survey Link software.
Before discussing the
creation of the digital drawings, it is important to discuss some of the issues
arising from the use of digital information.
The sharing and ownership of digital information is an important and
complex issue of great interest to the construction industry (Nasr &
AbdulNour, 1997). The sharing of
digital information unquestionably increases potential liabilities for the
architect and the engineer, and their reticence to share with the constructor is
understandable. Because the digital
information required to develop the layout drawings has already been assembled
by the engineer and the architect, it seems redundant for the constructor to
create yet another digital blueprint. However,
as mentioned previously, the project manager historically had been very
frustrated in his efforts to obtain this information, and felt that developing
and retaining ownership of this information was an important aspect of the
project.
The development of
the digital layout drawings yielded an unexpected benefit.
Prior to this project, the constructor had never developed a set of
digital drawings specifically dedicated to layout.
As the academic partner gathered the information necessary to begin the
AutoCAD drawings, several dimensional discrepancies between the structural and
architectural drawings became apparent. Obviously,
these issues had to be resolved before the layout drawings could be completed.
According to the superintendent, these types of discrepancies are common
on almost all projects. Discovering
these errors so early in the construction process gave the contractor time to
resolve the issues without impacting the schedule.
After the dimensional
conflicts were resolved, the construction layout drawings were made using
AutoCAD 2000 software. The drawings
were created with the knowledge that data would be exported from AutoCAD into
the Survey-Link software. Since the
process is critical to the success of the field layout, and since the process is
somewhat complex, a relatively detailed method for constructing the drawing is
presented below.
| Set
up drawing limits, unit system (Appendix A, Figure –1), and dimension
system (Appendix A, Figure –2) in a new drawing file using AutoCAD 2000. | |
| Define
appropriate layers and layer properties. Each category of objects in the
drawing, such as wall, column, foundation, text, and dimension, should be
given a unique layer, layer color, and/or line-type to separate from others
(Appendix A, Figure –3). | |
| Identify
all the objects needed by the superintendent to properly layout the
building. Identify the foundation edge, wall edge, and column foundation.
Use pre-defined layers on the new file and be careful to use the exact
dimensions defined on the original plans. | |
| Be
aware of the critical nature of errors.
Errors in construction layout can create costly problems. | |
| Define
the Layout Base-Point (the point where total station will positioned) on the
digital drawing, and set the “Base-Point” as the X-Y Coordinate System
(0,0) point. | |
| Create
a new AutoCAD drawing as a point block. Place a point at (0,0), and draw
proper attribute for this point (Appendix A, Figure –4). | |
| Return
to the original digital layout drawing, insert and copy the point block
(Appendix A, Figure 5) at the exact position of every point that needs to be
created. Then, change labels of these inserted blocks, name the Base-Point
as 0 and other points as 1, 2, and 3, etc. Each point must have a unique
label. | |
| Create
a “TXT” format file to define the content and format of the data to be
exported. Then, export all the point block attributes with the “ATTEXT”
command, (Appendix A, Figure –6) using the proper name, and format to
another “TXT” file (Omura, 1999). |
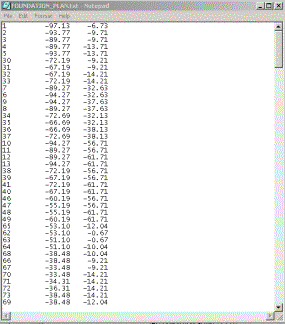
This exported
“TXT” file will now include the information needed by the data collector for
the layout. As noted on Figure 3, the first column is the numerical
descriptor of the point, and the second and third columns represent the related
X and Y coordinates.
|
|
|
Figure
3: The
foundation layout information file. |
Using the Digital Layout Drawings
in Conjunction with the Total Station
Once the layout
information file had been created, it was downloaded into the Survey-Link
software. Although creating, checking and downloading the file into the data
collector required about thirty hours of first time effort, the actual field
layout is now greatly simplified.
After downloading the
data file to the data collector, the superintendent, with the help of a project
engineer, laid out the entire foundation in less than one and half days. All
points on the foundation were laid out from one instrument set up point. The
data collector was connected to the total station with a cable. Each point was
laid out by simply turning a pre-programmed angle from a reference point, and
directing the other crew member to position the reflecting prism at the correct
distance.
Figures 4, 5, and 6
help describe how a typical five foot square column footing was located.
As previously stated, the Survey-Link software transforms the known
Cartesian co-ordinates of point 94 to the polar co-ordinates (angle and
distance). Thus, the operator simply turns the angle read from the data
collector, and directs the person holding the prism along his line of sight to
the correct distance, as read on the total station readout.
Point 96 is then located by exactly the same method.
When two of the four points have been located, the contractor uses a
template (Figure 6) to locate the other two points on the foundation.
Each of the more than 300 other layout points were laid out using polar
co-ordinates, allowing the layout crew to simply “sweep” the site, using a
continuously increasing angle.
|
|
|
Figure
4: Laying out of Point 94
utilizing total station and data collector. |
|
|
|
Figure
5: Laying out of Point 96
utilizing total station and data collector. |
|
|
|
Figure
6: Using a template to
identify Point 95 and Point 97 after points 94 and 96 are identified. |
Upon completion of
the “polar” layout, the superintendent spot checked several points. He did
this by measuring the X and Y distances (Cartesian) between several footings
with a tape, and comparing those dimensions with those on the drawings. No
discrepancies were found.
Post Project Interview
The superintendent
and the project manager were interviewed after of the layout phase of the
project. Both were enthusiastic
about the collaboration and mentioned several ideas that might merit future
collaborations. Both emphasized the importance of the ability of a construction
company to identify a problem and to be able to move quickly to resolve it by
working with an academic partner.
The project manager
and the superintendent were asked to comment on the resources required of the
constructor to utilize the advanced features of the total station for future
work and collaborations. They
identified three distinct areas.
First, the company
would have to find a way to create the digital layout drawings. This activity
was the most time intensive part of the courthouse project, and required about
25 hours. They commented that while
the drawings could be outsourced, they would ideally be done by an employee of
the construction company.
Second, a person
would have to be trained to transfer the digital drawings into a format that
could be read by the data recorder. They
felt that this activity would ideally be done by the same person that created
the layout drawings.
Last, the field
personnel would have to be trained to use the data recorder, and to understand
how to layout the building using polar co-ordinates and the data recorder in
conjunction with the total station. The
superintendent, having done this work himself on the courthouse project,
indicated that this step would require minimal training for a person already
familiar with the total station.
Despite the resources
required, the superintendent felt that the advantages of using the advanced
features of the total station far outweighed the cost of the resources.
He stated that more than 300 points were located in a little more than
one day, without a single error. Both
the superintendent and the project manager stated that they planned to use the
new system on all future jobs where they felt employees were capable of adapting
to the new technology.
Near the conclusion
of the interview the superintendent raised an interesting idea. He stated that
the most important outcome of the new system on this project was the
identification of dimensional discrepancies early in the project. Catching these errors saved thousands of dollars, and costly
delays. Both the superintendent and
the project manager opined that the creation of the layout drawings should
become a regular and planned for responsibility of the constructor, and part of
the general management of all projects.
On the Courthouse
Expansion Building project, only 2-dimensional (2D) building layout was
performed with total station and data collector. However, the superintendent and
the project manager are interested in exploring 3-dimensional (3D) building
layout, meaning a third dimension (elevation) can be incorporated into the
layout procedure. Additionally, the superintendent felt there was great
potential in utilizing the same technique to lay out of curbs and gutters, a
service that is now typically subcontracted.
Conclusion
This
case study was important for three reasons.
The study suggests that small scale industry-academic collaborations can
be a productive way for construction departments to interact with industry
partners.
Second,
the use of the advanced features of the total station for construction layout,
while requiring some allocation of resources, has potential for accelerating the
actual building layout and reducing expensive layout errors.
The third and perhaps
most important idea that emerged is the concept that constructors should
incorporate the creation of layout drawings into their standard project
management process. Simply going
through the process of creating the layout drawings almost insures no
discrepancies can occur between the engineering and the architectural drawings.
Given the relatively small investment of resources in creating these
drawings, it seems prudent that constructors create these drawings as part of
effective project management.
References
Arumala J. O. (2000).
The Impact of New Surveying Instruments on the Construction Surveying Course of
Study. Journal of Construction Education,
Vol. 5, No. 3, 227-243.
Badger W. W. (1999).
The Study Advisory Council and the Del E. Webb School of Construction at Arizona
State University. Journal of Construction
Education. Vol. 4, No. 2, 136-151.
Cheng M. Y. &
O’Conner J. T. (1996). Arcsite: Enhanced GIS for Construction Site Layout. Journal
of Construction Engineering and Management. Vol. 122, No. 4, 329-336.
Crawford W. G.
(1995). Construction Surveying and Layout.
Creative Construction Publishing, Inc.
Eiteljorg H. II.
(1994). Using a Total Station. CSA
Newsletter, Vol. VII. NO. 2.
Holloway R. R. &
Lukesh S. S. (1994). The Ustica Excavations – A Total Station, AutoCAD at
Work. CSA Newsletter, Vol. VII, No. 2.
Hynds T. & Smith
J. (2001). Industry Advisory Councils of Undergraduate Construction Programs: A
Comparative Study of Common Practices. ASC
Proceedings of the 37th Annual Conference, 239-246.
Nasr
K. J. & AbdulNour B. (1997). An Experience of Industry-University
Collaboration Research. 1997 Frontiers in
Education Conference Proceedings, IEEE, 317-320.
Omura G. (1999). Mastering
AutoCAD 2000., SYBEX Inc.
Powers
D. R, Powers M. F., Betz F., & Aslanian B. (1988). Higher Education in
Partnership with Industry. San Francisco: Jossey-Bass Publihers.
Tener
R. K. (1997). Industry-University Partnerships for Construction Engineering
Education. Journal of Professional Issues
in Engineering Education and Practice. Vol. 122, No. 4.
Wolf, P. R. (2002).
Surveying and Mapping: History, Current Status, and Future Projections. Journal
of Surveying Engineering, Vol. 128, NO. 3.
Wolf. P. R. &
Brinker R. C. (1989). Elementary
Surveying. Harper & Row, Publishers, New York.
Appendix
A – Exporting of Layout Data File with AutoCAD
|
|
|
|
|
|
|
Figure
1 |
Figure
-2 |
|
|
|
|
|
|
|
|
|
|
|
|
|
Figure
3 |
Figure
4 |
Appendix
A – Exporting of Layout Data File with AutoCAD (cont.)
|
|
|
|
|
|
Figure 5 |
Figure
–6
|
|
|
|